
Introduction to Screenshots
In an increasingly digital world, the ability to capture and share on-screen content has become a vital skill. Screenshots, essentially images of what is currently displayed on a screen, serve multiple purposes across various scenarios. From capturing important information for later reference to creating step-by-step tutorials, and sharing content with colleagues or friends, screenshots are an indispensable tool.
Understanding how to take a screenshot from a laptop is particularly essential given that laptops are commonly used devices in both professional and personal contexts. This adaptability makes them ideal for drafting reports, participating in virtual meetings, or even just browsing the web. In each of these instances, being able to quickly and efficiently capture what is on your screen can significantly streamline your workflow.
Moreover, screenshots can be incredibly useful for troubleshooting or receiving technical support. Instead of trying to describe an issue verbally, a well-timed screenshot can communicate the problem clearly and accurately, allowing for quicker resolution. Similarly, screenshots are invaluable in content creation, whether you are developing a blog post, constructing a presentation, or curating educational material.
Given the wide-ranging applications, knowing the specifics of how to screen shot from a laptop can be a game-changer. This comprehensive guide will delve into various methods specific to different operating systems and laptop models, ensuring that you are equipped with the know-how to take screenshots efficiently and effectively. Whether you are a novice or an experienced user, mastering this skill will undoubtedly enhance your digital interactions.
Basic Keyboard Shortcuts for Screenshots
Understanding the basic keyboard shortcuts for taking screenshots from a laptop is crucial for efficiently capturing important information on your screen. The specific shortcuts vary across different operating systems – Windows, macOS, and Linux – but they all aim to simplify the process. This section offers an in-depth exploration of these shortcuts and their functionalities.
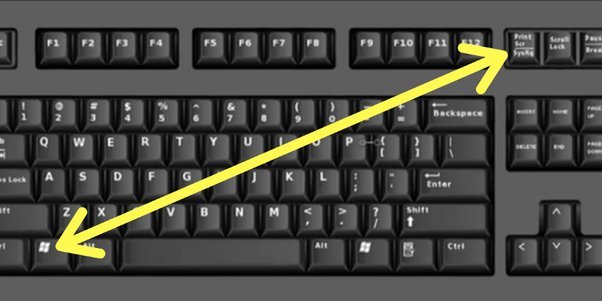
For Windows users, one of the most straightforward methods is the ‘Print Screen’ (PrtScn) key. Pressing this key captures the entire screen and copies it to the clipboard. To save the screenshot, you need to paste it into an image editing software like Paint and then save the file. Alternatively, ‘Alt + Print Screen’ captures only the currently active window, which can then be pasted and saved similarly. Another versatile option is ‘Windows Key + Shift + S,’ which opens the Snip & Sketch tool, allowing you to drag and select a specific screen area. The screenshot is copied to the clipboard and can be directly edited or saved.
macOS offers a different set of shortcuts that are equally efficient. ‘Command + Shift + 3’ captures the entire screen and saves it directly to the desktop. For more precise capturing, ‘Command + Shift + 4’ changes the cursor to a crosshair, enabling you to select any portion of the screen. The screenshot is immediately saved on the desktop, identifiable by the timestamp in the file name.
On Linux systems, particularly those using the GNOME desktop environment, the ‘PrtScn’ key captures the entire screen and saves it to the ‘Pictures’ directory by default. For more specific captures, ‘Shift + PrtScn’ allows area selection, and ‘Alt + PrtScn’ captures the active window, also saving these to the ‘Pictures’ directory.
Knowing how to screenshot from a laptop using these keyboard shortcuts significantly enhances your productivity by providing quick and easy methods for capturing screen content. These shortcuts are indispensable tools in both professional and personal computing environments, streamlining the process of saving vital information directly from your screen.
Using Built-In Screenshot Tools
Understanding how to take a screenshot from a laptop is essential for capturing and sharing important information quickly. Each operating system provides a variety of built-in utilities tailored to meet various screenshot needs. Here, we will delve into these tools across Windows, macOS, and Linux platforms, detailing their features and usage.
Windows: Snipping Tool and Snip & Sketch
For Windows users, the Snipping Tool and Snip & Sketch are fundamental utilities for screenshot capturing. The Snipping Tool, which has been a staple since Windows Vista, allows for free-form, rectangular, window, and full-screen snips. It can be accessed by searching “Snipping Tool” in the Start menu. On the other hand, Snip & Sketch, a more modern utility introduced with Windows 10, enhances the screenshot experience. To use Snip & Sketch, press Win + Shift + S, which opens a toolbar at the top of the screen for capturing rectangular, freeform, window, or full-screen screenshots. These tools offer intuitive options for editing and sharing your captures directly from the application.
macOS: Screenshot App
On macOS, the Screenshot app provides a robust and straightforward method for taking screenshots. Accessing the Screenshot app can be done by pressing Command + Shift + 5, which opens a toolbar with options for capturing the entire screen, a selected window, or a custom selection. The toolbar also includes tools for screen recording. macOS also supports quick shortcuts for specific types of screenshots, such as Command + Shift + 3 for a full-screen capture, and Command + Shift + 4 for a customizable selection.
Linux: GNOME Screenshot and Other Tools

Linux operating systems provide diverse screenshot tools depending on the desktop environment. For GNOME users, GNOME Screenshot is a powerful, pre-installed utility. Accessible via the application menu or by pressing PrtSc for a full-screen capture, it also offers options for capturing specific areas or windows. KDE users can use Spectacle, another comprehensive utility, which can be accessed via PrtSc and offers similar capturing functionalities. With Linux’s flexibility, users can also explore other tools like Shutter or Kazam for more advanced screenshot or screen recording needs.
Each operating system offers distinct built-in tools to help you understand how to screen shot from a laptop effectively, whether it’s full screen, windows, or custom areas.
When it comes to taking screenshots on a laptop, the built-in tools may suffice for basic needs, but third-party screenshot software offers advanced capabilities that can significantly enhance the user experience. Among the plethora of options available, Greenshot, Lightshot, Snagit, and ShareX stand out for their unique features and functionalities.
Greenshot
Greenshot is a free and open-source screenshot software that is highly valued for its simplicity and efficiency. It enables users to capture full screens, selected regions, or even specific windows. One of its standout features is the ability to annotate screenshots immediately after taking them. Greenshot also integrates seamlessly with cloud storage services like Dropbox, allowing for easy sharing and collaboration.
Lightshot
Lightshot offers a user-friendly interface that is perfect for both novice and experienced users. It excels in quick and hassle-free screenshot capturing with an intuitive edit and upload feature. Lightshot allows for instant sharing via a unique URL and provides built-in editing tools like text insertion and drawing shapes. Additionally, it supports cloud integration with services such as Google Drive and Dropbox.
Snagit
Snagit, developed by TechSmith, is renowned for its comprehensive features that go beyond mere screenshot capturing. Although it is a paid application, Snagit offers a robust set of tools for both capturing and editing images and videos. Unique features include panoramic scrolling capture, advanced image editing, and in-depth annotation capabilities. Users can also create GIFs from their screen recordings and integrate their captures with popular cloud services for seamless sharing and storage.
ShareX
ShareX is an advanced, open-source screenshot tool tailored for power users. It offers a wide range of capture methods, including full screen, window, region, and even scrolling capture. ShareX shines in its extensive post-capture options, delivering rich editing features, automated workflows, and multiple export options, such as uploading to numerous file-sharing services. The tool also supports screen recording, making it a versatile option for any kind of digital capture task.
These third-party applications provide features far beyond the built-in laptop tools, thereby enriching the screenshot-taking experience. Whether it’s for professional presentations, educational purposes, or everyday use, leveraging these advanced tools can make capturing and sharing screenshots a breeze.
Editing and Annotating Screenshots
Once you have captured a screenshot from your laptop, it is often necessary to edit and annotate the image to better convey the intended information. This enhances the clarity and effectiveness of the visual data you wish to share. Depending on your operating system and the specific needs of your project, there are several tools at your disposal, ranging from basic built-in editors to more sophisticated third-party options, which were discussed in the previous section.
For Windows users, Microsoft Paint is a straightforward tool readily available. After pasting your screenshot into Paint, you can easily crop the image to remove unnecessary portions. Cropping focuses the viewer’s attention by eliminating extraneous content. Furthermore, Paint enables you to add text, shapes, and lines to emphasize specific elements in your screenshot. This functionality is particularly useful for highlighting key data points or annotating processes and workflows.
Mac users can take advantage of the Preview application, which includes robust editing and annotation features. Similar to Paint, Preview allows cropping and resizing of images. Additionally, Preview offers the ability to add text, rectangles, circles, and arrows to screenshots. These annotation tools help in clearly signposting important areas of the screenshot, making it an effective means of communication.
For more advanced editing, third-party software provides enhanced capabilities. Applications like GIMP, Adobe Photoshop, and Snagit offer extensive features that go beyond the basics. In these programs, you can perform advanced cropping, adjust colors, and utilize layers for complex edits. Moreover, their annotation tools include more sophisticated shapes, text styles, and drawing tools, which can significantly improve the way you present and explain the content captured in your screenshots.
In any editing scenario, it’s crucial to keep your annotations clear and concise. Overloading a screenshot with too much information can detract from its purpose. Instead, striking a balance by using just enough text and shapes to guide the viewer without overwhelming them is essential.
Saving and Sharing Screenshots
Once you have captured a screenshot on your laptop, the next logical step is to save and share it appropriately. Understanding the different file formats available can be crucial in determining how to save your screenshot. JPEG and PNG are among the most commonly used formats. JPEG is ideal for images with complex color patterns as it compresses the file size, making it easier to share, while a PNG format is preferable for screenshots containing text or sharp lines, as it maintains the image clarity.
Choosing the right format is essential. For screenshots intended for professional documentation or online tutorials, PNG is often recommended due to its superior quality. On the other hand, for social media posts or quick sharing through messaging apps, JPEG may be more convenient because of its smaller file size.
Efficiently organizing your screenshots can save time and improve productivity. Create dedicated folders categorized by project, date, or purpose. This method not only helps in keeping your screenshots systematically arranged but also makes them easily retrievable when needed.
Sharing screenshots is straightforward with various platforms and tools available today. Email remains a popular choice; simply attach the screenshot file and send. For social media sharing, platforms like Facebook, Twitter, and Instagram allow direct uploading of image files. Direct messaging apps such as WhatsApp and Slack provide quick sharing options, where you can either attach the image directly or paste it from the clipboard.
Moreover, integrating your screenshots with cloud storage services like Google Drive and Dropbox can be extremely useful for seamless access across different devices. By uploading your screenshots to the cloud, you ensure they are stored securely and can be shared via a simple link. This method not only facilitates easy sharing but also helps in keeping a backup of your important screenshots.
Troubleshooting Common Issues
Taking a screenshot from a laptop can sometimes present challenges that may hinder the process. Common issues include screenshots not saving correctly, keyboard shortcuts malfunctioning, and poor screenshot quality. This section provides step-by-step solutions to these problems, enabling users to address and prevent such issues effectively.
One frequent issue is the screenshot not saving correctly. Users must first check their storage locations as default settings on laptops often save screenshots in specific folders like “Pictures” or “Screenshots.” Ensuring sufficient disk space is another preventive measure. If the problem persists, verifying user permissions for these folders can offer useful insights. Users should also ascertain that no other application interferes with the screenshot feature.
Malfunctioning keyboard shortcuts can be another common hurdle. To resolve this, it’s essential to ensure that the keys involved in taking screenshots are functioning correctly. Users can test them using a key tester tool. Reconfiguring keyboard shortcuts in system settings may also rectify this issue. Moreover, checking for software conflicts, such as other applications that may have overridden the default screenshot shortcuts, can be helpful. A system restart can often clear out temporary glitches affecting the shortcuts.
Issues with screenshot quality usually stem from display settings. Users should first ensure their screen resolution settings are optimized, as screenshots often mirror screen display properties. High-contrast or color calibration settings may adversely impact the capture quality and should be adjusted accordingly. Another effective tactic is utilizing dedicated screenshot software, which often includes advanced settings for higher quality captures.
Addressing these common troubles ensures a smooth and efficient experience when users are learning how to screen shot from a laptop. By following these solutions and preventive techniques, users can overcome the typical obstacles encountered during the screenshot process, enhancing their productivity while minimizing frustration.
Advanced Tips and Tricks
For those already familiar with the basics of how to screenshot from a laptop, diving into advanced techniques can significantly optimize your workflow. One lesser-known shortcut is using the Alt + Print Screen key combination to capture just the active window. This is particularly useful when working with multiple applications, allowing you to focus on a specific task without visual clutter.
Batch processing is an excellent method for users who need to capture multiple screenshots quickly. Tools like Snagit or Greenshot allow you to pre-define settings, enabling you to capture a series of screenshots in rapid succession. This feature saves time, especially during presentations or software testing.
Capturing scrolling screenshots is another advanced tip, pivotal for web developers or anyone needing to document long web pages. Tools like ShareX or browser extensions such as Fireshot can capture the entire page, ensuring you do not miss any vital information. These tools stitch multiple images together seamlessly, providing a hassle-free experience.
Utilizing dual monitors can be advantageous and occasionally challenging. To capture screenshots effectively across dual monitors, use specified tools or adjust your settings to focus on one screen at a time. Shortcuts like Windows + Shift + S in Windows or Command + Shift + 4 in macOS can help you define your capture area more precisely.
Effective organization and archiving practices are crucial for managing numerous screenshots. Categorizing images into folders based on projects or dates can simplify retrieval. Advanced users often employ automation tools like IFTTT or custom scripts to auto-save and sort screenshots, enhancing efficiency.
Incorporating these advanced tips and tricks into your repertoire can drastically improve your screenshot-taking skills. From utilizing lesser-known shortcuts and batch processing to mastering scrolling captures and archiving, these strategies will streamline your workflow and boost productivity.